Two screen / dual-head set up
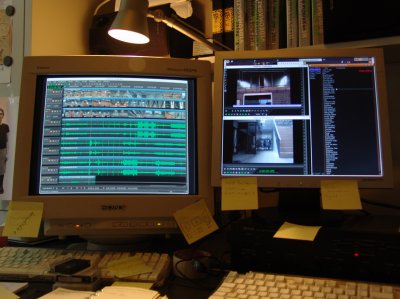
Super handy when working with a timeline / viewer editing software is a set up with several screens. I am busy with an elaborate project in Cinelerra, and scrolling through an endless timeline in a too small window is the last thing I need. A widescreen setup and being able to drag files from one screen to another is really a great help.
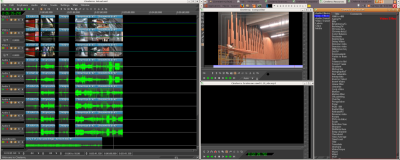
Getting it to work with Ubuntu 6.10 Edgy Eft and an ATI Technologies, Inc. RV280 [Radeon 9200 PRO] graphic card was quite straight forward. My machine now has a screensize of 2560×1024: see this screenshot:

A multiple screen set up with a shared desktop requires some rewriting of the /etc/X11/xorg.conf file, and activating the Xinerama extension to Xserver.
1: Xinerama
Install the X11 Xinerama extension library with apt-get / your package manager. See wikipedia for explanation on Xinerama http://en.wikipedia.org/wiki/Xinerama, and the Xinerama homepage: http://sourceforge.net/projects/xinerama
2: Back up
Make sure you keep a back up of the original /etc/X11/xorg.conf file. When things don’t work, you can easily restore the original. Remember you will have no GUI when the xorg.conf is corrupted. Plan your escape route. I prepared remote login access through ssh by having OpenSSH (both openssh-client and openssh-server) installed on my editing station and laptop with Synaptic package manager. Then have the computers on a network, which allows executing commands on the remote machine. How to do that is explained here: http://www.faqs.org/docs/securing/chap29sec311.html
3: Changing /etc/X11/xorg.conf
I have one graphic card with two ports: a VGA and a DVI port, so I activated both ports. I looked for tips on how to adapt my configuration: Ubuntu 6.10 Edgy Eft with an ATI Technologies, Inc. RV280 [Radeon 9200 PRO] graphic card. Very helpful was the xorg.config file published by Tony Whitmore. http://tonywhitmore.co.uk/blog/2006/02/07/dual-head-on-ati-radeon-9200-se-under-ubuntu/
I basically copied his file and changed the info of his graphic card with my own. Worked like a dream.
Now my new reworked /etc/X11/xorg.conf file looks like this:
#
# This file was generated by dexconf, the Debian X Configuration tool, using
# values from the debconf database.
#
# Edit this file with caution, and see the /etc/X11/xorg.conf manual page.
# (Type “man /etc/X11/xorg.conf” at the shell prompt.)
#
# This file is automatically updated on xserver-xorg package upgrades *only*
# if it has not been modified since the last upgrade of the xserver-xorg
# package.
#
# If you have edited this file but would like it to be automatically updated
# again, run the following command:
# sudo dpkg-reconfigure -phigh xserver-xorg
Section “Files”
FontPath “/usr/share/X11/fonts/misc”
FontPath “/usr/share/X11/fonts/cyrillic”
FontPath “/usr/share/X11/fonts/100dpi/:unscaled”
FontPath “/usr/share/X11/fonts/75dpi/:unscaled”
FontPath “/usr/share/X11/fonts/Type1”
FontPath “/usr/share/X11/fonts/100dpi”
FontPath “/usr/share/X11/fonts/75dpi”
# path to defoma fonts
FontPath “/var/lib/defoma/x-ttcidfont-conf.d/dirs/TrueType”
EndSection
Section “Module”
Load “i2c”
Load “bitmap”
Load “ddc”
Load “dri”
Load “extmod”
Load “freetype”
Load “glx”
Load “int10”
Load “type1”
Load “vbe”
EndSection
Section “InputDevice”
Identifier “Generic Keyboard”
Driver “kbd”
Option “CoreKeyboard”
Option “XkbRules” “xorg”
Option “XkbModel” “pc104”
Option “XkbLayout” “us”
EndSection
Section “InputDevice”
Identifier “Configured Mouse”
Driver “mouse”
Option “CorePointer”
Option “Device” “/dev/input/mice”
Option “Protocol” “ExplorerPS/2”
Option “ZAxisMapping” “4 5”
Option “Emulate3Buttons” “true”
EndSection
Section “InputDevice”
Driver “wacom”
Identifier “stylus”
Option “Device” “/dev/wacom” # Change to
# /dev/input/event
# for USB
Option “Type” “stylus”
Option “ForceDevice” “ISDV4” # Tablet PC ONLY
EndSection
Section “InputDevice”
Driver “wacom”
Identifier “eraser”
Option “Device” “/dev/wacom” # Change to
# /dev/input/event
# for USB
Option “Type” “eraser”
Option “ForceDevice” “ISDV4” # Tablet PC ONLY
EndSection
Section “InputDevice”
Driver “wacom”
Identifier “cursor”
Option “Device” “/dev/wacom” # Change to
# /dev/input/event
# for USB
Option “Type” “cursor”
Option “ForceDevice” “ISDV4” # Tablet PC ONLY
EndSection
Section “Device”
Identifier “DVIport”
Boardname “ATI Technologies, Inc. RV280 [Radeon 9200 PRO]”
Driver “ati”
BusID “PCI:1:0:0”
Screen 0
EndSection
Section “Device”
Identifier “VGAport”
Boardname “ATI Technologies, Inc. RV280 [Radeon 9200 PRO]”
Driver “ati”
BusID “PCI:1:0:0”
Screen 1
EndSection
Section “Monitor”
Identifier “GDM-400PST-L”
Option “DPMS”
EndSection
Section “Monitor”
Identifier “GDM-400PST-R”
Option “DPMS”
EndSection
Section “Screen”
Identifier “VGAScreen”
Device “VGAport”
Monitor “GDM-400PST-R”
DefaultDepth 24
SubSection “Display”
Depth 1
Modes “1280×1024” “1152×864” “1024×768” “832×624” “800×600” “720×400” “640×480”
EndSubSection
SubSection “Display”
Depth 4
Modes “1280×1024” “1152×864” “1024×768” “832×624” “800×600” “720×400” “640×480”
EndSubSection
SubSection “Display”
Depth 8
Modes “1280×1024” “1152×864” “1024×768” “832×624” “800×600” “720×400” “640×480”
EndSubSection
SubSection “Display”
Depth 15
Modes “1280×1024” “1152×864” “1024×768” “832×624” “800×600” “720×400” “640×480”
EndSubSection
SubSection “Display”
Depth 16
Modes “1280×1024” “1152×864” “1024×768” “832×624” “800×600” “720×400” “640×480”
EndSubSection
SubSection “Display”
Depth 24
Modes “1280×1024” “1152×864” “1024×768” “832×624” “800×600” “720×400” “640×480”
EndSubSection
EndSection
Section “Screen”
Identifier “DVIScreen”
Device “DVIport”
Monitor “GDM-400PST-L”
DefaultDepth 24
SubSection “Display”
Depth 1
Modes “1280×1024” “1152×864” “1024×768” “832×624” “800×600” “720×400” “640×480”
EndSubSection
SubSection “Display”
Depth 4
Modes “1280×1024” “1152×864” “1024×768” “832×624” “800×600” “720×400” “640×480”
EndSubSection
SubSection “Display”
Depth 8
Modes “1280×1024” “1152×864” “1024×768” “832×624” “800×600” “720×400” “640×480”
EndSubSection
SubSection “Display”
Depth 15
Modes “1280×1024” “1152×864” “1024×768” “832×624” “800×600” “720×400” “640×480”
EndSubSection
SubSection “Display”
Depth 16
Modes “1280×1024” “1152×864” “1024×768” “832×624” “800×600” “720×400” “640×480”
EndSubSection
SubSection “Display”
Depth 24
Modes “1280×1024” “1152×864” “1024×768” “832×624” “800×600” “720×400” “640×480”
EndSubSection
EndSection
Section “ServerLayout”
Identifier “Default Layout”
Screen “VGAScreen”
Screen “DVIScreen” LeftOf “VGAScreen”
InputDevice “Generic Keyboard”
InputDevice “Configured Mouse”
InputDevice “stylus” “SendCoreEvents”
InputDevice “cursor” “SendCoreEvents”
InputDevice “eraser” “SendCoreEvents”
Option “Xinerama” “on”
Option “Clone” “on”
EndSection
Section “DRI”
Mode 0666
EndSection
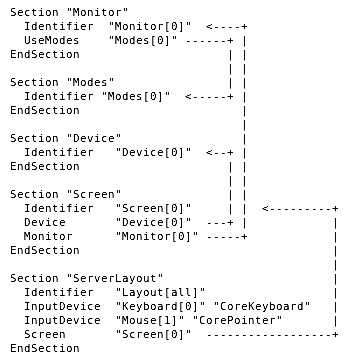
Here’s an explanation of how the xorg.conf file works, (before changing it, for a single monitor!) Copied from
http://www.novell.com/coolsolutions/feature/16543.html:
For a single head setup it looks like this:

Read this diagram bottom-up as: A given X-server layout consists of 1 screen, screen 1 (number 0) has a device (number 0) and a monitor (number 0), Device 0 is defined in the Section “Device” with Identifier “Device[0]”.
Monitor 0 is defined in the Section “Monitor” with identifier “Monitor[0]” and uses Modes[0], defined in de Section “Modes” with Identifier “Modes[0]”.
For a xinerama layout you have to ‘repeat’ this excercise for screen 2 and eventually screen 3, 4, 5 …
Those Identifiers are just strings you can name them what you want, as long as you make sure that when you reference a given identifier in another section you use the exact same string.
Two monitors might not be enough for you; you might want to work with 3, 4, 8, 12 … monitors: You can have two (or more) graphic cards and then attach one or several monitors to each card.
This site seems to give good leads if you want to try that http://gentoo-wiki.com/HOWTO_Dual_Monitors
Another How to; specific for AGP Fire GL 1000 and a PCI Matrox Millenium II cards: http://tldp.org/HOWTO/Xinerama-HOWTO/index.html
The link to the xorg.conf scheme given above is part of an explanation how to get three monitors working on two graphic cards in Suse:
http://www.novell.com/coolsolutions/feature/16543.html

Recent Comments